UPDATES: See the activities in action here!
Click here to download a FREE PATTERN and instructions for the Quidditch Lacing Page!
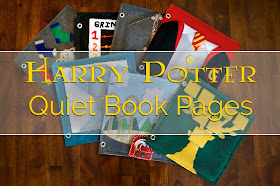
Wow...this was a big project for me and I couldn't be happier with the results! I spent about three weeks making it, since I was only able to work on it at night and during nap time on the weekends. This will probably be a never ending project for me, because I can always create more pages as Rhys gets older. I can swap the pages out for new ones, or change the order if I want to.
All of the pages are made with two layers of matching felt and a layer of firm pellon interfacing in the middle. When I was done sewing the activity onto a page, I sandwiched the page with the interfacing in the middle and a matching blank felt page on the back, and used a sewing machine to sew around all four edges. Then, I used a hole punch to cut two holes on the left edge and hammered on two grommets to secure the holes. See my post here if you want to see how I made the cover and how the pages are bound together. This is a really long post because I explain how I made each page, but I included more pictures of each page below if you want to see them!
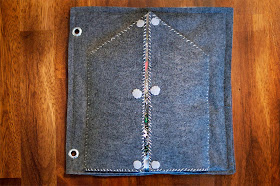
Uniform Buttoning Page
I love this page because not only does it help your child learn how to button, it also has some cute features! The vest unbuttons and opens up to reveal the shirt and tie. The tie snaps on and off, and there is a shirt pocket hidden under the vest and robes for storing something. I made a quick pair of glasses out of felt to put in there for now, but I may switch it out for something else in the future.
Instructions
Prep and Cutting
This page became pretty thick because of all the layers, but I love the way it turned out! I cut the shirt shape out of white felt, which was basically a square with two triangles on top for the collar (they will later be turned down). I also cut a small white square to form the shirt pocket. I then cut the top corners off to make the shoulder area. The vest was cut from two layers of gray felt, then I flipped one layer to make the shapes a mirror imagine of each other. For the robes, I cut each side out of black felt, and cut two small strips of red felt for the lapels. The badge was cut from a layer of red felt and a smaller version of that shape in black felt, plus a G cut from yellow felt. I also used three yellow buttons and one hammer on snap to secure the tie to the page.
Shirt and Vest
I whip stitched the white shirt to the page, and folded the collar over and whip stitched the top of that to the page to keep it folded over. I added a little white pocket to the shirt at the last minute, which was just a square piece of white felt stitched to the white shirt, but open at the top to form a pocket. I then stitched the outer edges of each gray piece of vest to the background, making sure that they overlapped so they could be buttoned together. Once the vest was in place, I cut the button holes out of the left piece and stitched around the holes, then sewed the buttons to the right side of the vest.
Black Robes
Before stitching the robe to the page, I whip stitched the red lapels onto each robe piece. Then I added the Gryffindor badge by stitching a red and black badge shape to the front of the robe, then sewed the yellow G on top of it. Once those details were complete, I whip stitched the tops and outer edges of each black piece to the page background.
Tie
The tie snaps on to the shirt, so I started by cutting out the tie shape in two layers of red felt. I added a snap through the back layer, and attached the coordinating snap to the middle of the shirt collar. I stitched the yellow stripes onto the front layer of the tie, then blanket stitched both layers of the tie together. Another last minute addition is the pair of glasses that I tucked into the shirt pocket...these are really flimsy and won't hold up to Rhys playing with them, but they look cute for now. I will probably put an old pair of his sunglasses in there eventually.
'I Spy' Room of Requirements Page
This is one of my favorite pages because an I Spy activity is so easy to make, and so much fun to play with! I knew I wanted to incorporate this activity into my book, and I loved the idea of making it the Room of Requirement. It seemed like the perfect Harry Potter reference for a game focused on finding lost or hidden objects :)
Instructions
Prep and Cutting
This page was arguably the easiest to make, but the most expensive because of the trinkets I bought to fill in the pouch. To assemble the page, I cut the room shape out of one layer of clear vinyl, gray felt and cream felt. Fill it with whatever beads or trinkets you'd like to use as your 'filler' and then put a handful of 'hidden' objects in too.
Beads and Hidden Objects
I found this container of crafting beads at Michael's and ended up using about half the container. I loved the look of these trinkets for the Room of Requirement theme, but other plastic crafting beads or pony beads would be cheaper and work well too. For the hidden items, I bought a small bag of tiny plastic mythical creatures (dragons, unicorns, etc...I'm sure there are some unicorns lurking around the room of requirement...right??) that I found on sale and some miniature items like books, clothes hangers and household goods.
Pouch and Doors
I sandwiched the cream felt and vinyl together and whip stitched them to the page around all edges except for the top. I filled the pouch with a mix of trinket beads and hidden items, then whip stitched the opening closed. It ended up being a pretty thick page, but I wanted plenty of trinkets for the other objects to hide in. For the doors, I took the shape I cut out of gray felt and cut it in half down the middle to create the door shapes. I cut six small circles out of a lighter gray felt and whip stitched them to the inner edges of the doors. Then, I whip stitched each door around the top, inner edge, and bottom just as a decorative feature, but whip stitched the outer edge to the background page to secure it.
Gringotts Counting Page
This page is about learning how to count! It's also just fun to play with :) I decided to make an abacus out of Gringotts bank, because a counting activity seemed to tie in well with a bank. I also chose rainbow colors for the numbers, strings and beads, but you could use one color for everything instead. You could also make the numbers smaller and place the strings closer together if you wanted to fit 1-10 on the page.
Instructions
Prep and Cutting
I cut three long rectangles out of white felt to make the pillar shapes, then cut stacks of coins in yellow and light gray felt in various heights. I also cut circles out of yellow and gray felt for single coins. I used string and pony beads from the craft store and just cut the strings to be about 10 inches long so I had enough to work with. The hardest part was cutting out the numbers and letters just because it is so time consuming. Cut the Gringotts letters all out of the same color of felt, and cut your numbers (1-5) out of coordinating colors of felt to match your string and beads.
Pillars and Background Coins
The first thing I did was place the two outer white pillars on the page and stitch the outer edges to the black background to secure them. I then filled in the area between them with stacks of coins and sewed those to the page using a whip stitch.
Strings and Beads
Next, I used a needle to create the holes for the strings of beads. I pushed the needle up through the back of the black background and made 5 holes underneath where the left white pillar would be stitched down. I just swiveled the needle around to stretch the felt a little, then threaded each string through it's hole. Once the strings were threaded through the holes on the left side of the page, I tied a double knot in the string behind the black felt and I threaded the beads onto the other end of each string. Then, I made 5 more holes on the right side of the page (under where the white pillar would be stitched) and fed the other end of the string through there. I pulled the strings tight enough to keep them straight, tied knots behind the black felt and cut the excess string. To make sure the strings stay secure, you could add a dot of hot glue to each knot.
Letters and Numbers
Once the strings were threaded and tied off, I finished stitching the two white pillars to the page by whip stitching on the three remaining sides, then whip stitched the top pillar to the page too. Lastly, I sewed the five numbers and the Gringotts letters to the page.
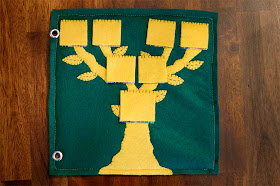
Grimmauld Place Family Tree Page
Instructions
Prep and Cutting
I cut all of the tree branches and leaves out of level felt, then cut 7 squares out of yellow felt and 7 matching squares out of clear vinyl. I printed 7 pictures of family members (Rhys, parents, and both set of grandparents) onto glossy photo paper, and cut them out into squares. Once everything was cut out and ready, I assembled them on the page.
Assembling the Tree
I assembled the trunk and branches on the page first, and used a whip stitch to secure them to the page, then I went in and added the leaves, whip stitched them around the edges and using a running stitch to embroider the line down the middle of each leaf.
Sewing the Photos
For the photos, I placed a square piece of vinyl of top of each photo and sewed that down to the green background using a whip stitch around all four sides. Then, I took a matching yellow square and sewed it on top of each picture by just whip stitching across the top edge to create a flap. It was hard to hand sew through the vinyl and the photo paper, but it worked! Printing onto fabric would have been easier, but I didn't have any and didn't want to order it just for this project. Just be careful when stitching through vinyl and the photo paper: if you accidentally make a hole by bringing your needle up through the wrong spot, the hole will stay visible (unlike with felt).
Quidditch Lacing Page
UPDATE: Click here to download a FREE PATTERN and instructions for this page!
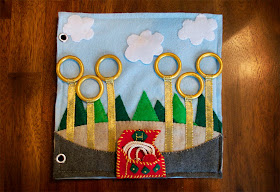
This is absolutely my favorite page and it's almost too pretty to let Rhys play with! This was the first page I sewed and I am in love with it. I knew I wanted to have a lacing activity in the book and a quidditch page, then I came up with this design and it turned out exactly how I pictured it! It took some prep work to paint the rings, but it didn't take too long to sew the page once everything was cut out and ready to go.
Instructions
Prep and Cutting
First, I bought a pack of small (1 inch) plastic craft rings from Joann's and painted them with two layers of gold acrylic paint. I cut out all the shapes for the trees, clouds and the stadium and arranged them on the background page in the order I wanted. I cut all the chest pieces out and cut about a 10 inch piece of white string that I found in my husband's tool box :) I bought a spool of gold wire ribbon and cut 6 strands that were double the height of each ring from the ground. You will also need one snap if you want the chest to be able to snap on and off the page.
Clouds, Trees and Stadium
For all the background pieces, I arranged them on the page and then chose what to sew first. I started with the clouds, and stitched the two outer clouds to the page going around all sides with a whip stitched. For the middle cloud, I sewed a small snitch underneath, then placed the cloud on top and only sewed along the top, so that the cloud lifts up like a flap. Next I sewed the trees down, then the sand colored piece of the stadium.
Hoops and Posts
I took my six pieces of ribbon and laced each one through a hoop, doubling the ribbon over to form the post. Since my ribbon had wire, it was easy to pinch it just beneath the hoop to keep it in place. I started by using a clothespin to hold the ring in place, then sewing several stitches into the ribbon just beneath the hoop to secure it in place on the page. Then, I worked by way down the ribbon, whip stitching down both sides. Repeat for all six posts.
Chest
The quidditch chest is made from two layers of red felt sandwiched together to make a pocket. Before sewing the layer together, I added one side of the snap to the back piece of felt. I then stitched both layers together around the sides and bottom, leaving the top open. I used yellow embroidery floss to embroidery stitches along all of the edges, then stitched green accent pieces to the front of the chest, and one to the lid. I backstitched a yellow H to the green ornament on the lid, and made three yellow french knots on the green accent pieces on the front of the chest. Once the chest was finished, I hot glued one end of the string to the inside bottom of the chest, then hot glued one red circle to the other end. I sandwiched a matching red circle on top, and blanket stitched around the edges to form the ball. Finally, I added the other side of the snap to the bottom of the page for the chest to snap onto.
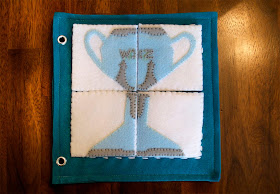
Triwizard Cup Puzzle Page
This is a very simple puzzle page, but could be made with more pieces to make it challenging for an older child. You could make a puzzle out of any object or picture, but I chose the Tri Wizard Cup because it made a more challenging shape for the puzzle pieces.
Instructions
Prep and Cutting
For this page, I used felt, firm pellon interfacing, velcro and hot glue. I cut 8 squares out of white felt for the puzzle pieces, and cut 8 pieces of velcro to secure them to the page. I cut the wizard cup design out first, then cut it into fourths to make the four separate pieces.
Puzzle Pieces
For each puzzle piece, I used two layers of white felt with firm pellon interfacing in the middle to help hold the shape. I started by sewing the cup design down to the top layer of felt for each puzzle piece. Once the cup design was stitched down to all four pieces, I sandwiched each top piece of felt with a layer of pellon and another layer of felt, then blanket stitched around all four edges. Finally, I hot glued velcro onto the back of each puzzle piece.
Puzzle Board
The background was the easiest part to complete. I arranged all four pieces on the page and used a full strand of embroidery floss to make a running stitch around the edges of each piece. Lastly, I hot glued the 4 remaining pieces of velcro to the middle of each square.
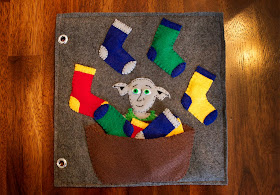
Dobby Sock Matching Page
I have seen several sock matching quiet book pages on Pinterest and knew I wanted to include one in my book. It just wouldn't be right to have a sock page in a Harry Potter quiet book without Dobby! Each sock has a little craft magnet inside of it to help them stick together, but the magnets I bought are not very strong so they don't do a good job of holding the socks in place. The page still turned out great and I chose to make the socks in the house colors!
Instructions
Prep and Cutting
I started by cutting out the sock design until I had one I liked. Once I had the shape down, I cut out 3 layers of felt for each color sock. Then, I cut out 3 sets of accent pieces for each sock, and two layers of brown felt for the basket. Lastly, I cut Dobby's shape out of light gray felt, and used green and white felt for his eyes and his smock. I also used 8 small craft magnets and hot glue.
Dobby and Basket
To start, I laid out all of the pieces on the background page until I was happy with their positioning. Then, I sewed dobby's body down to the page using a black thread and a running stitch (and a satin stitch for his ears). I back stitched his nose, mouth and eyebrows, then placed his eyes and sewed them down with one french knot each in black thread. I sewed his smock down using a whip stitch, then placed the back of the basket on the page and sewed it down. I sewed the front of the basket down to the page using a whip stitch around all sides, but only used a whip stitch around the top edge to keep it open.
Socks
For the background socks, I hot glued a magnet to the background place underneath where each sock would go, then sewed each sock shape to the background page on top of the magnet. I sewed the accent pieces on top of the socks using a whip stitch for everything. To make the matching socks, I sewed a magnet to the inside of one layer of the sock, then blanket stitched both sock pieces together. I then placed matching accent pieces on both sides of each sock and carefully sewed them in place using a whip stitch.













Wow! This quiet book is amazing. Thank you so much for sharing.
ReplyDeleteThanks Nancy!
DeleteI love it!
ReplyDeleteI'm going to be an aunt very soon and this is exactly what I had been searching for \o/
Thank you so much for sharing :D.
Love this. I will have to start working on my little boy's quiet books!! My son's name is Rhyse. I was wondering if your Rhys was similar :)
ReplyDeleteGreat detailed post! Love it! Only thing missing is patterns. Do you have patterns for the pages available anywhere?
ReplyDeleteHi Jackie! I have a pattern for the Quidditch page coming soon! :)
DeleteThis is one of the coolest things I have ever seen!!
ReplyDeleteThank you so much Tonya! :)
DeleteI love it!! So awesome!! It really got me thinking! What about a Snape potion page? Or a Phoenix page where you can dress him up in his flames and turn him into an egg again? Really great ideas!!
ReplyDeleteThanks Betty! Those are awesome ideas!
DeleteThis is absolutely AWESOME! You are quite talented. Thanks for sharing all this with us.
ReplyDeleteThank you so much for sharing your ideas with us! I have wanted to make one of these, but wasn't sure where to start. I can't thank you enough!
ReplyDeleteAmazing!
ReplyDelete