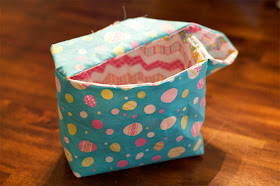
For this project you will need two patterns of fabric: one for the outside of the bag and one for the lining. Two fat quarters will provide enough fabric to make this bag, with a little left over for other projects! You will also need fusible interfacing if you want to give the bag structure.
2. I used fusible interfacing (pellon 808) on the back of my bag fabric to give the bag some structure. If you use interfacing, cut a 12x18 inch piece and iron it onto the back of the fabric. I just barely had enough interfacing left for this project, which is why you can see some of my bag fabric peeking out on the side.
5. Place your hand into the bag and flatten the bottom corner to form a triangle. Line up the bottom seam and the side seam of the bag and press them both in the same direction.
6. Measure about 2 inches up from the tip of the triangle and sew a straight line from one edge to the other.
7. Once you finish sewing both corners, cut off the tip of the triangle you made above the seam line.
8. Reach into the bag and push the new corners out to square them off. Your bag (still inside out) should stand up now!
9. Repeat the same steps for the lining. Here you can see how the bag fabric looks with interfacing compared to the lining.
10. Now you are ready to sew the strap! Place your two pieces of 3.5x16 inch fabric together, right sides facing, and pin them for sewing. It's hard to tell here, but that is the back side of the
blue fabric.
11. Sew along both long edges with a 1/4 inch seam allowance. You can also sew along one short edge, just keep one short edge open! When you are done sewing, turn the strap right side out.
12. Iron the strap or just press it down if you are lazy like me :) The unfinished edge will be hidden in the finished bag, so don't worry about top stitching the strap unless you want to.
13. Now it's time to assemble all the pieces! Keeping the body of your bag inside out, place the strap down into the bag with the top side facing down. Whichever fabric you want to show on the top of the strap, make sure this fabric is facing down into the bag. Line the strap up with the two seams on opposite sides of your bag.
14. Next, place the lining down into the bag on top of the strap. Make sure you turn your lining right side out before placing it into the bag.
15. Line up the two seams of the lining with the two seams of the bag body and align the ends of the straps with these seams. Pin all three layers in place at the two sides, then pin all the way around the top of the bag.
16. Sew around the top edge of the bag with a 1/4 inch seam allowance. It doesn't matter where you start, but make sure you sew over both ends of the strap and leave a 3 inch opening at the end so you can turn the bag. When you get to a side seam, check to make sure your strap is still in place and backstitch over it to make sure it stays secure.
When you are finished sewing, your bag should look like this.
17. Find the three 3 inch opening you left...
...now it actually looks like a bag!
19. Find the 3 inch opening you left in the seam and press and pin the fabric in place.
20. Top stitch around the top of the bag to close up the hole and to finish the seam. Sew as close to the seam as possible to catch the fabric at the opening.
And you're done! You can iron it again to smooth out the wrinkles, or leave it if you're going to hand it off to a destructive toddler anyway ;)


No comments:
Post a Comment