Showing posts with label Play Food. Show all posts

Thursday, May 21, 2015

Felt Pizza Play Food


Instructions


Supplies

For this project I used the following supplies:
  • 3 sheets of tan felt
  • 1 sheet each of white, red, green and beige felt
  • Embroidery floss in white, tan, red and green
  • Two pieces of card stock.  


Prep and Cutting

I made a pattern for the pizza by tracing a 10 inch circle onto two pieces of card stock, then cutting that circle into four quarters.  I used the quarter pieces as patterns to cut out the pizza slices, and later sandwiched the cardstock in between the felt layers to give the pizza slices more stability.  Using one of the slice patterns, I cut out 8 pieces of tan felt (2 per slice) and 4 pieces each of white and red felt (1 per slice).  I cut a few inches off the top of each white piece and cut a wavy edge to look like cheese.

For the crust, I cut four semi-circles out of my remaining tan felt using the slice patterns as a guide. For the toppings, I chose to make pepperoni, green peppers and mushrooms.  Cut two circles out of red felt for each pepperoni, three small strips out of green felt for each pepper, and two small mushroom shapes out of beige felt for the mushrooms.

Pizza

For each pizza slice, I started by layering the white cheese on top of a red piece of felt and a tan piece of felt.  I sewed the three layers together only going around the white shape with a blanket stitch.  Next, I added a piece of cardstock and another piece of tan felt to the bottom of that, and added a piece of crust along the top edge.  I blanket stitched around the crust shape, going through all layers of felt and cardstock, then blanket stitched down the two remaining sides of the pizza slice.  I trimmed down the cardstock patterns first to make them a little smaller than each pizza slice so I wouldn't be pushing my needle through them.


Toppings

All of the toppings were easy to make, once everything was cut out! The pepperonis and mushrooms are just two layers of each shape, blanket stitched together.  The peppers are each made from three strips of green felt.  Start by lining up the ends of two strips, and sewing a few stitches through to secure them together.  Then, line the third strip up to one of the free ends, and sew those together.  Lastly, take the two remaining ends and sew them together with a few stitches.  It should look like a warped triangle, and when you turn it inside out it curls into a little pepper shape.  


Friday, February 27, 2015

Felt Sandwich Play Food


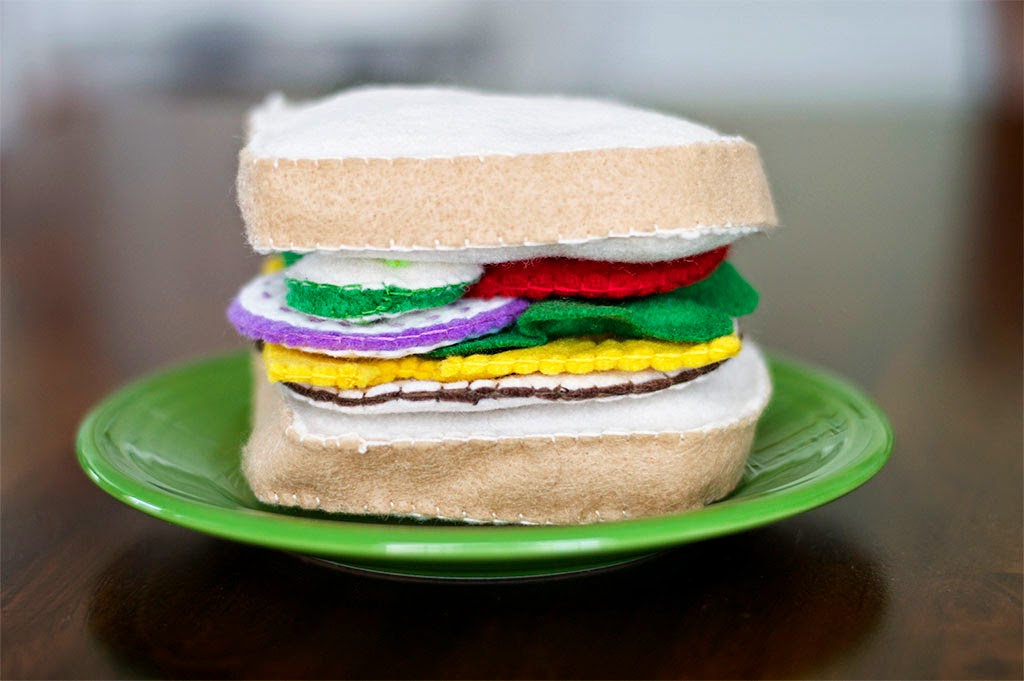
I started this project a few weeks ago and just couldn't get motivated to finish it until now.  I kept starting up other projects and coming back to this to finish one piece at a time.  A sandwich seems like a simple concept, but some of these ingredients (I'm looking at you lettuce and tomato) gave me a hard time.  In the end, I was glad to finish this and I think it turned out pretty cute for my first attempt!


Bread
I made the bread slices first and they turned out a little thicker than I planned, so I would definitely make them thinner next time.  I cut four bread shapes out of cream colored felt, and cut two long strips out of beige felt for the crust.  My felt sheets weren't long enough to go all the way around the bread, so I had to sew two strips together to make each crust.

I blanket stitched one edge of the crust to one side of bread, then placed the other slice of bread against the other edge of crust and blanket stitched that side too.  Before closing up the last side, I stuffed the bread just enough to give it shape, then finished stitching the hole closed.


Ingredients
I ended up making just a few sandwich ingredients for now, and I might add more once Rhys is older. The slice of turkey is made from two layers of cream felt with a layer of brown felt in the middle that is a little wider than the cream color to give the turkey a roasted edge.  The cheese is just two identical pieces of yellow felt blanket stitched around all four sides and all of the holes.  

I made the onion out of two pieces of white felt and two pieces of purple felt.  On each piece of white felt, I used a running stitch in purple thread to make four concentric circles for the rings.  I stitched each piece of white felt to a purple circle, then blanket stitched both purple circles together, white sides facing out.  The tomato is also made from four pieces of red felt, and I embroidered four yellow seeds onto two of the circles.  For the remaining two circles, I cut out a rounded plus sign and sandwiched each of those pieces on the outside of the seeded circles and stitched around the plus sign shape.  To finish, I placed both joined pieces together and blanket stitched around the outside.

The cucumber slices were each made from two pieces of white felt and a strip of green felt for the outer edge.  I sewed them together just like I sewed the bread slices, but embroidered three seeds onto each side before sewing them together.  I also put a small amount of stuffing in them before closing them up.  I had two previous attempts at making a piece of lettuce and they both turned out looking like leaves.  I finally decided to just use one piece of green felt and sew knots at the back to bunch the fabric on the front.  Some of the knots are visible on the back, but I doubt Rhys will care :)


Thursday, February 19, 2015

Felt Donuts Play Food


This was my first attempt at making play food out of felt, and I think they turned out so cute!  If you are comfortable sewing a blanket stitch or if you have a sewing machine, this is a quick and easy project to make.  I hand sewed all four of these donuts, but you could easily sew them with a machine too.


Instructions


Prep and Cutting
To start, find any CD you have laying around the house and trace the outside of the CD onto a piece of paper.  Next, draw a small circle at the center of the shape you just traced (slightly bigger than the hole at the center of a CD), then cut your shape out to use as a template.  Trace the outside of the CD again onto another piece of paper, draw a circle in the center then draw a frosting shape around the center.  Cut this piece out around the frosting shape to use as a template.  Use your donut template to trace two shapes onto the same color of felt for every donut you want to make.  Use your frosting template to trace one shape onto each color of frosting you want to use.  You will also need stuffing to fill your donuts with, and embroidery floss to sew them together.

Assembly and Frosting
For each donut, you will need two donut shapes cut from the same color of felt, and one frosting shape.  Place the frosting piece on top of one donut shape, and stitch around the outer perimeter of the frosting.  Next, stack the three pieces of felt together and blanket stitch through all three layers around the center hole of your donut.  Make sure you are grabbing all three layers with your stitches, otherwise your stuffing will come out when you fill it later.  Once the center hole is completely stitched, start adding the sprinkles.  I just used long stitched of embroidery floss to make all of the sprinkles, so grab a few different colors and make random stitches around the frosting.  You will need to hold the bottom piece of the donut out of the way to make sure you are only stitching through the top layer of the donut and the frosting.

Closing and Stuffing
Once you are done decorating your donut, start blanket stitching around the outer edge of the donut, going through both layers of the donut.  You can wait until the end to stuff the donut, or do it as you go.  Just remember to leave an opening at the end to stuff it before you sew the donut closed.  Make sure the stuffing is even, then finish off stitching around the outside of the donut. 


For the jelly filled donut, I used the same template but didn't cut the hole out of the center.  I stitched the frosting on top first, then blanket stitched around the edge of the donut shape.  I left an opening about an inch and a half wide and cut a half circle shape out of the donut.  I filled the donut with stuffing then prepared the inner piece.  I took a piece of light cream felt and stitched a small piece of pink onto it for the jelly, then cut the whole shape into a long oval to fit into the half circle opening.  Finally, I blanket stitched the oval filling shape to the opening of the donut around all sides.


Copyright © 2014 Today I Felt Crafty