Friday, February 27, 2015

Felt Sandwich Play Food


I started this project a few weeks ago and just couldn't get motivated to finish it until now.  I kept starting up other projects and coming back to this to finish one piece at a time.  A sandwich seems like a simple concept, but some of these ingredients (I'm looking at you lettuce and tomato) gave me a hard time.  In the end, I was glad to finish this and I think it turned out pretty cute for my first attempt!
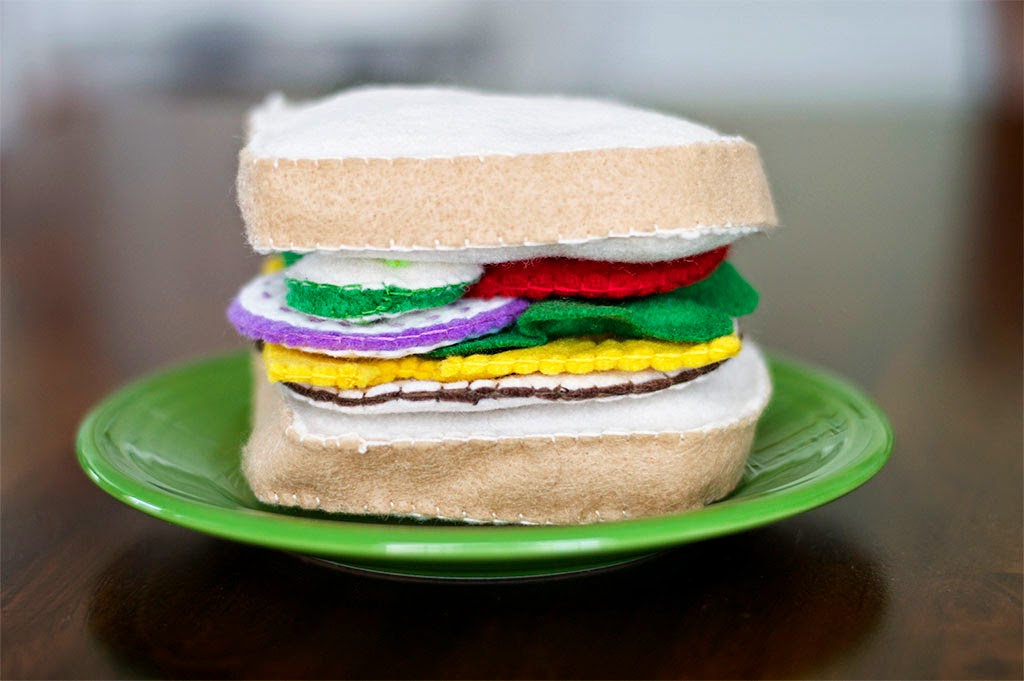


Bread
I made the bread slices first and they turned out a little thicker than I planned, so I would definitely make them thinner next time.  I cut four bread shapes out of cream colored felt, and cut two long strips out of beige felt for the crust.  My felt sheets weren't long enough to go all the way around the bread, so I had to sew two strips together to make each crust.

I blanket stitched one edge of the crust to one side of bread, then placed the other slice of bread against the other edge of crust and blanket stitched that side too.  Before closing up the last side, I stuffed the bread just enough to give it shape, then finished stitching the hole closed.


Ingredients
I ended up making just a few sandwich ingredients for now, and I might add more once Rhys is older. The slice of turkey is made from two layers of cream felt with a layer of brown felt in the middle that is a little wider than the cream color to give the turkey a roasted edge.  The cheese is just two identical pieces of yellow felt blanket stitched around all four sides and all of the holes.  

I made the onion out of two pieces of white felt and two pieces of purple felt.  On each piece of white felt, I used a running stitch in purple thread to make four concentric circles for the rings.  I stitched each piece of white felt to a purple circle, then blanket stitched both purple circles together, white sides facing out.  The tomato is also made from four pieces of red felt, and I embroidered four yellow seeds onto two of the circles.  For the remaining two circles, I cut out a rounded plus sign and sandwiched each of those pieces on the outside of the seeded circles and stitched around the plus sign shape.  To finish, I placed both joined pieces together and blanket stitched around the outside.

The cucumber slices were each made from two pieces of white felt and a strip of green felt for the outer edge.  I sewed them together just like I sewed the bread slices, but embroidered three seeds onto each side before sewing them together.  I also put a small amount of stuffing in them before closing them up.  I had two previous attempts at making a piece of lettuce and they both turned out looking like leaves.  I finally decided to just use one piece of green felt and sew knots at the back to bunch the fabric on the front.  Some of the knots are visible on the back, but I doubt Rhys will care :)


Thursday, February 19, 2015

Felt Donuts Play Food


This was my first attempt at making play food out of felt, and I think they turned out so cute!  If you are comfortable sewing a blanket stitch or if you have a sewing machine, this is a quick and easy project to make.  I hand sewed all four of these donuts, but you could easily sew them with a machine too.


Instructions


Prep and Cutting
To start, find any CD you have laying around the house and trace the outside of the CD onto a piece of paper.  Next, draw a small circle at the center of the shape you just traced (slightly bigger than the hole at the center of a CD), then cut your shape out to use as a template.  Trace the outside of the CD again onto another piece of paper, draw a circle in the center then draw a frosting shape around the center.  Cut this piece out around the frosting shape to use as a template.  Use your donut template to trace two shapes onto the same color of felt for every donut you want to make.  Use your frosting template to trace one shape onto each color of frosting you want to use.  You will also need stuffing to fill your donuts with, and embroidery floss to sew them together.

Assembly and Frosting
For each donut, you will need two donut shapes cut from the same color of felt, and one frosting shape.  Place the frosting piece on top of one donut shape, and stitch around the outer perimeter of the frosting.  Next, stack the three pieces of felt together and blanket stitch through all three layers around the center hole of your donut.  Make sure you are grabbing all three layers with your stitches, otherwise your stuffing will come out when you fill it later.  Once the center hole is completely stitched, start adding the sprinkles.  I just used long stitched of embroidery floss to make all of the sprinkles, so grab a few different colors and make random stitches around the frosting.  You will need to hold the bottom piece of the donut out of the way to make sure you are only stitching through the top layer of the donut and the frosting.

Closing and Stuffing
Once you are done decorating your donut, start blanket stitching around the outer edge of the donut, going through both layers of the donut.  You can wait until the end to stuff the donut, or do it as you go.  Just remember to leave an opening at the end to stuff it before you sew the donut closed.  Make sure the stuffing is even, then finish off stitching around the outside of the donut. 


For the jelly filled donut, I used the same template but didn't cut the hole out of the center.  I stitched the frosting on top first, then blanket stitched around the edge of the donut shape.  I left an opening about an inch and a half wide and cut a half circle shape out of the donut.  I filled the donut with stuffing then prepared the inner piece.  I took a piece of light cream felt and stitched a small piece of pink onto it for the jelly, then cut the whole shape into a long oval to fit into the half circle opening.  Finally, I blanket stitched the oval filling shape to the opening of the donut around all sides.


Sunday, February 15, 2015

Rainbow Busy Board


I made this board as a little experiment to see if I could keep Rhys occupied at an upcoming doctor's appointment.  I wanted to make something with several activities, but didn't want to spend a week sewing it together.  I used my sewing machine for this entire project (as opposed to hand sewing), and it only took a little under 2 hours to make!  Most of that time was spent sewing the buttons on and finding/arranging all of the pieces I wanted to use.  Rhys was more interested in playing with it at home, and couldn't get enough of the zippers!  He played with it for a few minutes at the doctor's office, but is much more interested in exploring his surroundings when he's in a new place.  I'm still really happy with how this turned out, and plan to make more with different activities in the future.


Both sides are made from a piece of 8x8 inch felt with a layer of firm interfacing sewn on the back.  The blue side has three zippers sewn down and a button lacing activity.  The zippers and buttons are all sewn through the felt and the interfacing to keep them secure.  The top three buttons have a string tied around them, and the string can be laced around the buttons of coordinating color.


The green side has a vinyl window full of multicolored sequins and two overlapping strings of beads. The window was made by sewing a square of yellow felt and a square of clear vinyl to the green felt (and the interfacing), on three sides.  I left one side open and filled the window with sequins and 5 silver trinkets, then sewed that last side closed.  After the window was finished, I sewed four strips of blue felt on the sides for extra security and to give the window a little border.  Lastly, I hand sewed a button to each corner.

I installed four small eyelets through the green felt and the interfacing and threaded a string through each of the two holes on the right.  I tied each string off with a double knot to secure it behind the eyelet, then strung them both with 12 beads.  I threaded the other sides of the strings through the remaining two eyelets on the left, and tied the strings off with a double knot on that side as well.


Before sewing the pages together, I cut 12 squares out of felt in rainbow colors, and two strips out of green felt.  I sewed the two green strips together to make a handle and positioned the handle between the tops of both pieces of felt, then sewed the pieces together along the top side.  I placed six felt squares on each side in between the pages so that the were sticking out on both sides of the board.  Then, I sewed around all three remaining sides to close up the board.


Saturday, February 7, 2015

Busy Town Quiet Mat


I am so happy with how this turned out!  I made this mat for a friend's son and I hope he gets many years of use out of it.  The mat took me a little over a week to finish.  It folds out into a 10x15 inch mat, just like my Valentine's Day mat, so it is easy to transport.  The roads are also wide enough to play with matchbox cars, in case any of the felt cars become lost over the years. There are a ton of pictures below with descriptions of each play scene!

The Cover


The cover is made from a piece of cotton fabric and fusible interfacing (pellon 808) for structure.  It closes like a book and is secured by a strap with velcro.  The strap is made from the same cotton fabric sewed around a scrap piece of firm interfacing.  Before assembling the cover, I hand stitched Owen's name, birthday and a heart onto a piece of blue felt, and then whip stitched that piece to the back of the cover.


The Mat and Cars


Everything on the mat was cut from acrylic felt and hand sewn to the green background, which is a 10x15 inch piece of acrylic felt.  The cars are all made from two layers of felt, with a smaller layer of firm interfacing in the middle for stability.  I also sewed buttons on for the wheels and attached a snap to the back of each car.  The cars each have a place to be snapped onto the mat.  This helps keep them in place when the mat isn't being used so they don't get lost!  Each car also has a matching scene to play with in the town:

The Farm


The farm scene is the home of the green pickup truck and has two fun hidden features.  There is a cow behind the barn doors, and two carrots growing under the dirt!

The House and Beach


When I was thinking of ideas for the town, I knew I wanted to include a small beach scene, because the boy I made this for lives near the beach.  You can lift the waves to see the two fish under the water, and I also sewed a beach chair and beach umbrella to the page.  The blue car snaps in next to the house.

The Construction Zone


The construction zone is the home of the orange dump truck.  There are mounds of dirt and piles of rocks strewn around the area, and there is one mound of dirt with a hard hat and shovel hiding behind it.  The dump truck snaps to the page in the middle of the traffic circle.

The School


The school house has three colored flaps that lift in different directions to reveal the letters A, B and C (backstitched).  There is a snap next to it for the school bus, and a school crossing zone on the road in front of it.

The Hospital


The hospital has a matching ambulance that snaps in next to it, and the front door can be lifted to reveal a red cross symbol.  I used french knots to make the apples of the trees next to the school and the hospital.

The Police Station


The police station has a parking lot out front for the police car to attach to, and both of the black windows open to reveal jail cells inside.  I used long stitches of embroidery floss to make the parking spots and jail cells.


Copyright © 2014 Today I Felt Crafty